Build a personal tasks page in Notion
Based on Notion's video on YouTube. If you like this content, support the original creators by watching, liking and subscribing to their content.
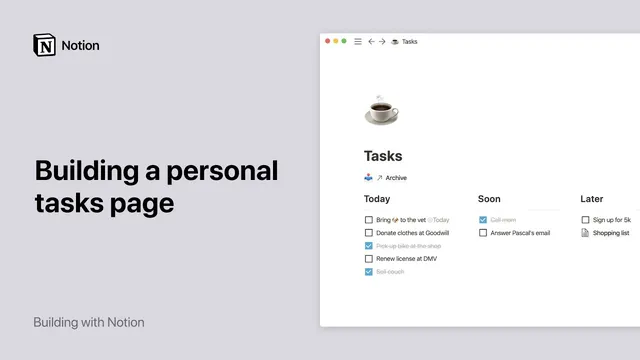
Build a simple Notion tasks page with column headings, checkboxes under each column, and @ reminders to prevent items from being missed.
Briefing
Notion can be used to build a personal tasks system that starts simple—columns, checkboxes, and an archive—and scales into a database-driven workflow where each task becomes its own page with rich details, reminders, and multiple ways to view progress. The practical payoff is straightforward: tasks move through a process without anything getting lost, and the system can grow from “quick list” to “full project tracker” as needs change.
The first setup is built from scratch on a new Notion page. Tasks are organized into columns created with headings (for example, “Soon” and “Later,” plus additional categories). A three-column board is created by inserting a handle next to each header and dragging it into place, then enabling full-width and small text for readability. Under each column, checkboxes are added so tasks can be checked off when completed. To prevent important items from slipping, reminders can be attached to tasks using the @ reminder command with a specific date and time; desktop and mobile apps can deliver push notifications when Notion is open.
Completed work is handled with an “archive” page. Instead of deleting finished items, an archive page is created at the top of the tasks page, and completed tasks are dragged into it using the six-dot handle. The workflow stays flexible: tasks can be dragged and dropped between columns at any time, letting the board reflect the user’s current stage.
The second setup uses a pre-built “task list” template from Notion’s template gallery, then customizes it. This version is a database board where each task card is actually a separate page. Clicking a card opens the task page, where users can store additional information such as checklists, drafts, and media—like uploading a photo that appears on the board via a page content preview. At the top of each database page, “properties” define structured fields for every task.
Out of the box, the board includes a status property (to-do, doing, done). The system is expanded by adding more properties: due dates (with optional reminders), tags (single-select categories such as school, work, personal), and priority levels (low, medium, high). With these properties in place, the board can group tasks by status and also be reorganized by tags or priority.
Multiple database views make the system adaptable. A calendar view can be added to visualize due dates, and list views can be filtered—for example, showing only tasks where tag equals “school.” Views can be renamed and switched instantly, all pulling from the same underlying database. For users who want to start from zero, the same structure can be rebuilt by creating a board, defining columns, and then adding the same properties and views. The end result is a tasks setup tailored to personal workflow—simple enough for quick wins, robust enough for ongoing projects across work and life.
Cornell Notes
A two-tier Notion approach turns personal task management into something both flexible and trackable. The simple version uses a page with columns and checkboxes, plus reminders and an archive page for completed items. The advanced version uses a database board where each task card opens into its own page, letting users store rich details like checklists and uploaded photos. Structured properties—status, due date, tags, and priority—enable filtering and sorting. Multiple views (board, calendar, and filtered lists like “school tasks”) let the same task data support different perspectives without rebuilding the system.
How does the “simple” tasks page work, and what makes it useful for everyday to-dos?
What’s the key difference between the simple board and the database-based “task list” version?
Which properties are added in the advanced system, and what do they enable?
How do multiple views help manage tasks without duplicating data?
How can the advanced database be rebuilt from scratch if the template is skipped?
Review Questions
- What steps turn a completed checkbox item into an archived task in the simple setup?
- In the database-based version, how do properties like tags and priority change what can be filtered or grouped?
- Why does making each task card open into its own page matter for managing complex tasks?
Key Points
- 1
Build a simple Notion tasks page with column headings, checkboxes under each column, and @ reminders to prevent items from being missed.
- 2
Create an “archive” page and drag completed tasks into it to preserve progress without cluttering active columns.
- 3
Use the “task list” template for a database board where every task card is a dedicated page for richer details.
- 4
Add structured properties—status, due date, tags, and priority—to enable grouping, filtering, and at-a-glance tracking.
- 5
Create multiple database views (board, calendar, and filtered lists like “school tasks”) to review the same tasks from different angles.
- 6
If skipping templates, recreate the database board from scratch by defining columns first, then adding the same properties and views.