Building Kratky Buckets | Kratky Hydroponics | Pepper Cuttings | New Grow Area Sneak Peek
Based on LittleTechGirl's Digital Homestead's video on YouTube. If you like this content, support the original creators by watching, liking and subscribing to their content.
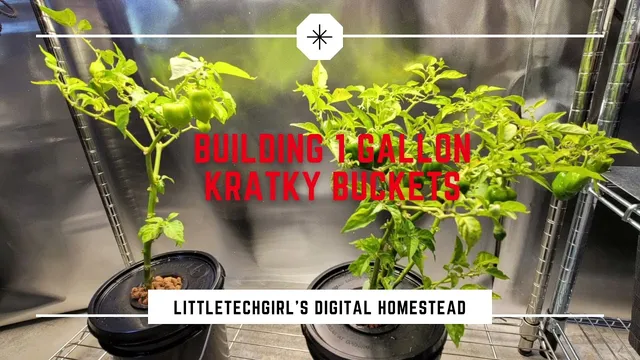
Use food-safe one-gallon black buckets with a drilled 3-inch net cup opening so the cup seats cleanly and securely.
Briefing
A DIY Kratky setup for pepper cuttings is built around food-safe one-gallon buckets, drilled to fit net cups, then tested with different rooting and water-level strategies. The core takeaway is that pepper cuttings can be moved from soil or grow media into a passive hydroponic “Kratky bucket” system with careful hole-cutting and nutrient start-up—while small hardware details (like net cup lip design) can make or break whether the plant sits correctly.
The process starts with sourcing black, food-safe buckets and assembling the parts: the bucket, its cap/top, and a 3-inch net cup. Holes are drilled into the bucket top so the net cup drops in cleanly; sandpaper is used to smooth rough edges. Drilling can cause the bit to bind, so the workaround is switching to reverse to free it, then cleaning up the opening so the net cup seats properly. Once the net cup fits, pepper cuttings are inserted.
A key complication comes from how pepper roots and media behave. The roots often carry remnants of the original grow sponge, which clings to the root mass and slowly breaks down over time. The creator notes that the net cups are robust and hard, but thinner alternatives can be modified more easily. To help roots hang through, thinner net cups are cut by removing the bottom of the cup—though cutting too much can remove the support needed for clay pebbles. In practice, the bottom is trimmed just enough to allow root passage while still letting clay pebbles hold the plant upright.
Water management is tested by raising the water level so roots sit in water immediately, allowing them to slowly drink and draw downward as the system runs. Several pepper plants are transferred: one from a local nursery after washing off soil, and others that had been rooted earlier. One ornamental pepper plant that was moved into the system shows new flowers and appears “happy” under indoor lighting, while another similar plant died quickly—suggesting the starting plant’s health may matter as much as the method.
After transplanting, the system is filled with expanded clay pebbles and a nutrient start. The creator adds 8 milliliters of Aerogarden nutrients and then 2 milliliters of “Calmad” to give plants an indoor head start after being outdoors. The plants sit under an “Optic LED Gmax 250” grow light (two units in the area), alongside other rooting experiments.
The broader grow area is also being built out for comparison: pepper cuttings in root riot plugs (some with Clonex on the tips, others with cinnamon), pepper seeds, and additional tomato cuttings (including “Mucho Nacho Jalapeno” cuttings and multiple seed varieties like King Star Lemon Starburst and Lemon Spice Jalapeno). The setup is actively used to test different rooting approaches and varieties, with the Kratky bucket system serving as the latest indoor trial for pepper propagation.
Cornell Notes
The Kratky pepper system is assembled from food-safe one-gallon buckets with drilled openings sized for 3-inch net cups. Pepper cuttings are moved from soil or grow sponge media into the net cups, with expanded clay pebbles used to hold plants upright while roots hang through. Because net cup geometry matters, thinner cups may need the bottom cut out—carefully enough to allow root passage without removing support for the clay pebbles. Rooting success is also influenced by starting plant health and by water level; one approach raises water so roots begin in water immediately. Nutrients are started with Aerogarden nutrients plus Calmad, and plants grow under an Optic LED Gmax 250.
How are the bucket and net cup configured for a one-gallon Kratky setup?
What happens when pepper roots are transferred from their original media?
Why might net cups need modification, and what’s the tradeoff?
What water-level strategy is tested for the cuttings?
How are nutrients added at the start, and why?
What other rooting variables are being compared in the grow area?
Review Questions
- What specific mechanical adjustment to the net cup is needed when the cup lip is too thin for the bucket hole?
- How does the chosen water level at transplant time change root exposure in a Kratky bucket?
- Which nutrient products and amounts are used to start the indoor Kratky system, and what reason is given for adding Calmad?
Key Points
- 1
Use food-safe one-gallon black buckets with a drilled 3-inch net cup opening so the cup seats cleanly and securely.
- 2
Smooth drilled edges with sandpaper to prevent rough contact and improve net cup fit.
- 3
Expect grow sponge remnants to cling to pepper roots after transfer; they typically break down gradually.
- 4
Thin net cups may need the bottom cut out so roots can pass through, but trimming must preserve enough structure for clay pebbles to hold the plant upright.
- 5
Raise the reservoir water level so roots start in water, then let the system’s passive drawdown do the rest.
- 6
Start nutrients with 8 milliliters Aerogarden nutrients plus 2 milliliters Calmad to support plants transitioning from outdoor conditions.
- 7
Run side-by-side rooting tests using different treatments (Clonex vs cinnamon) and different varieties to compare success rates.