Cosmographer 3+ - How to Map a Space Ship
Based on Josh Plunkett's video on YouTube. If you like this content, support the original creators by watching, liking and subscribing to their content.
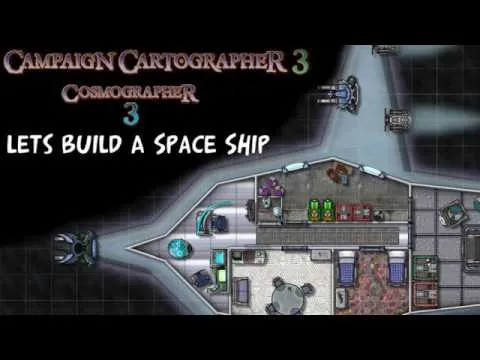
Create a new Cosmographer 3+ map using a space deck-plan style, then save to generate a blank working canvas with a starfield background.
Briefing
Cosmographer 3+ for Campaign Cartographer 3+ lets tabletop GMs generate a usable sci-fi spaceship deck plan quickly—starting from a blank starfield map, then layering grids, ship geometry, interior symbols, and finally exporting a print-ready PNG/JPEG. The workflow matters because it turns what’s usually a time-consuming art task into a repeatable process that can support play in systems like Starfinder, where custom ship layouts often need to be ready fast.
The process begins by installing the Cosmographer 3+ add-on and creating a new map via the add-on’s space-focused styles. After selecting the “deck plan bit map” style (chosen over older “traveller” and “vector” options), the user sets a map size, picks a starfield background, and saves to generate a blank working canvas. From there, the first practical step is adding a movement grid—specifically a square overlay with labeling turned off and spacing set to 5x5 (treated like 5-foot increments). This grid becomes the reference for placing ship components and tokens.
Next comes the ship’s outline and interior layout. Using Cosmographer’s drawing tools, the user selects a “whole” speeder light shape tool that creates a mirror-image drawing as points are placed around the canvas. The resulting shape is then repositioned with the move tool. Because Campaign Cartographer 3+ doesn’t refresh automatically after every action, a manual refresh button is used to see changes immediately.
With the hull in place, the tutorial shifts to interior detailing using symbol catalogs: floors/corridors, doors, engineering stations, thrusters, and other ship systems. The user demonstrates snapping behavior—keeping it on for alignment, then turning it off when free placement is needed for more organic-looking engine shapes. Symbol scaling is handled through right-click parameters (including a “set normal” reset when a symbol is accidentally scaled down). A deck plan “wings” layout is added, then walls are traced carefully: the wall tool is started on a straight segment (not a corner) and drawn around the perimeter, with special effects activated to add bevels/glows.
To make the space feel navigable, the user adds an airlock/cargo door and fills a cargo bay with crates and drums. The floor is replaced with a more appropriate industrial floor symbol by drawing a new shape over the area. A pilot area follows: a desk, chair, and life-support/reader-style elements are placed, and layering (“sheets”) is used to ensure the chair sits underneath the desk. The tutorial shows how to identify symbol sheets using a “list” command and how to reorder objects using “send to back.”
Finally, the map is polished. Special effects are toggled on to apply shadows, bevels, and glows across symbol sheets and walls; properties are adjusted when needed (for example, removing a floor shadow by switching to a flat floor style). Additional details like tractor-beam/weapon elements and engineering conduits with colored engine glow are added. A ship name is generated using Fantasy Name Generators, placed with a text tool, and the grid is deleted so the exported image looks clean. The finished result is exported as a selected-area PNG/JPEG and can be brought into tools like Fantasy Grounds for play, printing, or further use.
Cornell Notes
Cosmographer 3+ inside Campaign Cartographer 3+ provides a fast, repeatable way to build a spaceship map for sci-fi RPGs. The workflow starts with choosing a space deck-plan style, adding a square movement grid (e.g., 5x5 for 5-foot spacing), and drawing a ship hull using Cosmographer’s “whole” shape tools. Interior layout is built by placing symbol-catalog elements—thrusters, deck plan wings, walls, doors, cargo items, and pilot furniture—while controlling snapping, scaling, and layering (“sheets”) so objects sit correctly (like a chair under a desk). Special effects (shadows/bevels/glows) are then activated and tuned, a ship name is added, the grid is removed, and the map is exported as PNG or JPEG for use in play or printing.
How does the process turn a blank canvas into a usable spaceship layout quickly?
Why does grid snapping matter, and when should it be turned off?
What problem can layering (“sheets”) solve when symbols overlap incorrectly?
How are walls and special effects handled to make the ship readable?
How does the tutorial refine the look before exporting?
Review Questions
- What steps in the workflow ensure the map is immediately usable for movement and token placement?
- How does the tutorial correct an overlap issue caused by placing furniture in the wrong order?
- What role do special effects and symbol properties play in the final exported map appearance?
Key Points
- 1
Create a new Cosmographer 3+ map using a space deck-plan style, then save to generate a blank working canvas with a starfield background.
- 2
Add a square movement grid early (e.g., 5x5 spacing with labels off) so ship components and tokens align consistently.
- 3
Draw the hull using Cosmographer’s “whole” ship shape tools, then reposition with the move tool as needed.
- 4
Build interiors by placing symbol-catalog elements (thrusters, deck plan wings, walls, doors, cargo, furniture) while managing snapping and scaling.
- 5
Use “sheets” to control which objects appear on top of others—especially for overlaps like a chair under a desk.
- 6
Activate and tune special effects (shadows/bevels/glows) and adjust symbol properties when specific visuals (like floor shadows) need correction.
- 7
Export a clean PNG/JPEG by removing the grid and exporting only the selected map area.