CREATE a Menu & Recipe Planner with Notion! | Beginner Tutorial + Free Template
Based on The Organized Notebook's video on YouTube. If you like this content, support the original creators by watching, liking and subscribing to their content.
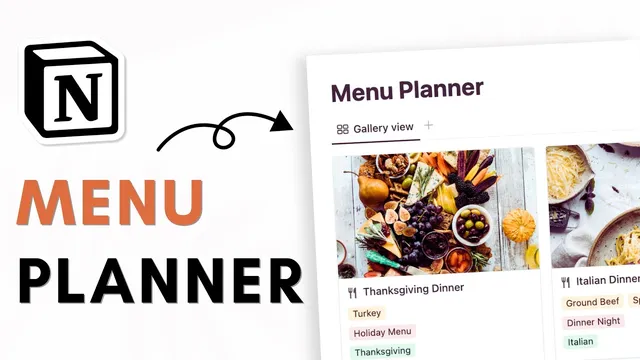
Create two gallery databases in Notion: one for “menus” and one for “recipes,” then connect them with a relation property.
Briefing
A Notion-based menu planner can be built around two connected databases—one for menus and one for recipes—so every menu automatically pulls in the right dishes, ingredients, and tags. The payoff is practical: once recipes are stored (manually or via Web Clipper), creating a new menu becomes mostly a matter of naming it, tagging it, and selecting which recipes belong.
The setup starts with a page titled “Menu Planner,” optionally with an icon and cover, then switches to a clean layout (small text, full width). Two gallery-view databases are added: “menus” and “recipes.” The “recipes” database is customized first by adjusting layout settings (card size, cover/page preview choices) and removing unnecessary default properties. Core recipe fields are then created: a name, tags (e.g., “Italian”), a multi-select “course” (like “Main” or “Side”), a multi-select “ingredients” list, and a URL field for sources. A cover image can be added per recipe, and key properties (course, ingredients, tags) are turned on so the cards show the essentials at a glance.
Next comes the connection between recipes and menus. A sample menu entry like “Italian dinner night” is created with its own tags (such as special occasions or holiday meals). A relation property links each menu to multiple recipes. On the menu side, rollup properties aggregate information from the related recipes—pulling unique ingredient values and unique tag values—so the menu card displays what’s actually in the lineup. The menu card can also get its own cover image, and the same process is repeated for additional dishes (e.g., adding “garlic bread” as a “Side” with its own ingredients).
To make the menu feel like a structured plan rather than a flat list, a “menu template” is created. The template uses a linked view of the recipes database, filtered so it only shows recipes related to the current menu template. It also groups items by “course,” letting main dishes and sides appear in separate sections. Options like hiding empty groups and reordering groups help keep the layout readable. Notes can be added to the template using headings, dividers, and bullet points, and the template can be set as the default so every new menu automatically includes the same sections.
Finally, recipes can be added through Notion’s Web Clipper. When a recipe page is saved from Chrome into the “recipes” database, it can be retitled, tagged (e.g., “Thanksgiving”), assigned a course, and populated with ingredients. Creating a new menu like “Thanksgiving dinner” then allows the relevant recipes to be linked, with the menu template automatically reflecting ingredients, tags, and course grouping. The result is a reusable system for holiday dinners, dinner nights, and any recurring meal planning workflow—complete with a free template link provided in the description.
Cornell Notes
The menu planner is built in Notion using two connected gallery databases: one for “menus” and one for “recipes.” Each recipe stores tags, a multi-select course (e.g., Main/Side), multi-select ingredients, and an optional URL/source, plus a cover image. Menus link to multiple recipes via a relation property, and rollups on the menu side aggregate unique ingredients and tags from the linked recipes. A “menu template” adds a filtered linked view of recipes grouped by course, so each menu automatically shows the right dishes under Main and Side sections. Web Clipper lets users save recipes from Chrome directly into the recipes database, then link them into menus for fast holiday planning.
How do the “menus” and “recipes” databases work together to keep information synchronized?
What recipe properties make the planner useful for both browsing and planning?
Why add rollup properties to the menu database?
How does the “menu template” turn linked recipes into a structured meal plan?
How does Web Clipper speed up adding new recipes to the system?
Review Questions
- What combination of Notion features (relation, rollup, linked view, filter, group) is required to make a menu page automatically list dishes by course?
- If a new recipe is added to the recipes database but not linked to a menu, what parts of the menu page will still update—and which will not?
- How would you modify the recipe properties if you wanted to plan by dietary restrictions (e.g., vegetarian, gluten-free) in addition to course and ingredients?
Key Points
- 1
Create two gallery databases in Notion: one for “menus” and one for “recipes,” then connect them with a relation property.
- 2
Store recipe essentials as structured properties: tags, multi-select course, multi-select ingredients, and an optional URL/source.
- 3
Use rollup properties on each menu to automatically aggregate unique ingredients and tags from all linked recipes.
- 4
Build a “menu template” that includes a linked view of recipes filtered to the current menu and grouped by course for a clean Main/Side layout.
- 5
Add notes directly inside the menu template so every new menu starts with the same planning sections.
- 6
Use Notion Web Clipper to save recipes from Chrome into the recipes database, then link them into menus to populate the plan quickly.
- 7
Customize layout options (card preview, cover images, show/hide database titles) to keep both databases readable as they grow.