Create a SIMPLE personal dashboard with Notion ( + top 10 Tips) | Beginner Tutorial + Free Template
Based on The Organized Notebook's video on YouTube. If you like this content, support the original creators by watching, liking and subscribing to their content.
Build the dashboard around two databases: a calendar and a board-style to-do list.
Briefing
A personal dashboard in Notion can be built around two core databases—a to-do list and a calendar—then organized into a clean, navigable layout that links back to those databases. The result is a single “hub” page where tasks can be tracked in stages and calendar items can be viewed by month or week, without duplicating data or cluttering the interface.
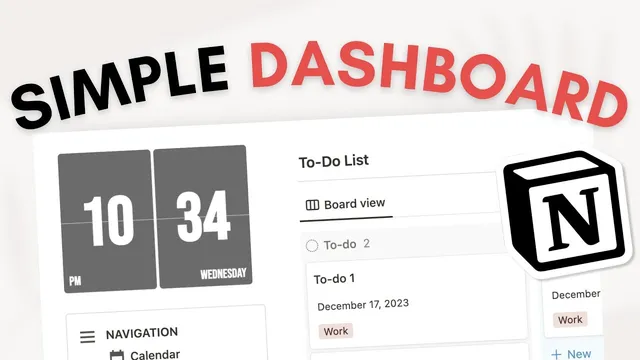
The setup starts from an empty Notion page, which gets branded with a title, icon, and a minimal cover image (with Unsplash suggested for stock photos). The page is then switched to full width to create more usable space. From there, two databases are added: a Calendar database and a To-do list database. The to-do list is created as a board view so tasks can be dragged across statuses, while the calendar is initially added as a database that can later be displayed in different time granularities.
To make the dashboard usable at a glance, a left-side navigation is built using a callout block. Inside that navigation, linked views are added for both the calendar and the to-do list. These “linked view of database” blocks show the same underlying databases, but in a compact, dashboard-friendly format—so changes made in one place stay consistent across the page. The linked views also have their database titles hidden via layout settings to keep the layout minimal.
The dashboard is then arranged into a two-column structure: navigation on the left and the main to-do list and calendar views on the right. A load limit is set (to 10) to prevent the page from becoming overcrowded. Headings are added for clarity using dividers and heading formatting, separating the to-do section from the calendar section.
Task tracking is refined by editing database properties. In the to-do board, a status property is kept for the board workflow, while an “assign” property is removed since this is intended for personal use. Additional properties can be added depending on how tasks are categorized—such as a multi-select “tag” field and a date field (shown as due dates). Completed tasks are handled by dragging items into a “complete” column.
On the calendar side, the layout is expanded by duplicating the calendar view to create both monthly and weekly options. Calendar entries can include properties like tags (for example, tagging an item as “vacation”) and dates, making it easier to filter and interpret events.
Finally, the dashboard becomes extensible. New pages can be added directly from the dashboard using Notion templates, allowing quick insertion of items like a personal weekly to-do list, quick notes, or a reading list. A finishing touch is a clock widget placed on the dashboard, using Widget Box’s “Retro clock” with customization options such as color (a grayer tone for a minimal look). The finished page combines task management, time planning, quick template additions, and a visual widget into one streamlined personal workspace.
Cornell Notes
The dashboard is built around two Notion databases: a board-style to-do list and a calendar. Linked views place compact versions of those databases into a left-side navigation while the main page shows larger, cleaner sections with titles hidden. The to-do list uses a status workflow for dragging tasks across stages, and it can be enriched with properties like multi-select tags and due dates. The calendar is duplicated to provide both monthly and weekly views, and entries can also carry tags and dates. Templates and a clock widget make the dashboard expandable and more pleasant to use day to day.
Why create a to-do list as a board view instead of a simple list?
What does “linked view of database” accomplish on the dashboard?
How does the dashboard stay uncluttered when it includes multiple views?
How are tags and dates used to make both tasks and calendar entries more useful?
How are monthly and weekly calendar views created without rebuilding everything?
What two additions make the dashboard more scalable and personal over time?
Review Questions
- What properties are kept or removed in the to-do database to support a personal board workflow?
- How does a linked view differ from creating a separate database, and why does that matter for consistency?
- What steps create both monthly and weekly calendar views from one calendar database?
Key Points
- 1
Build the dashboard around two databases: a calendar and a board-style to-do list.
- 2
Use “linked view of database” blocks to populate navigation and main sections without duplicating data.
- 3
Switch the page to full width and hide database titles to keep the layout clean.
- 4
Set a load limit (e.g., 10) so multiple views don’t overwhelm the page.
- 5
Add task properties like multi-select tags and due dates to make the to-do board more actionable.
- 6
Duplicate the calendar view to create both monthly and weekly layouts via layout settings.
- 7
Extend the dashboard with Notion templates and a customizable clock widget from Widget Box’s “Retro clock.”