How I Tidy Up My Digital Workspace
Based on Tiago Forte's video on YouTube. If you like this content, support the original creators by watching, liking and subscribing to their content.
Clear the desktop and Downloads folder weekly to reduce friction at the start of each work cycle.
Briefing
A weekly “tidy” of two high-traffic areas—Mac desktop and the Downloads folder—can cut digital clutter fast and make the next work cycle feel immediately usable. The core idea is simple: treat these spaces like a physical desk or office. Because people spend more than 11 hours per day on devices, small routines that keep the most visible folders clean can deliver the same practical benefits as tidying in the physical world.
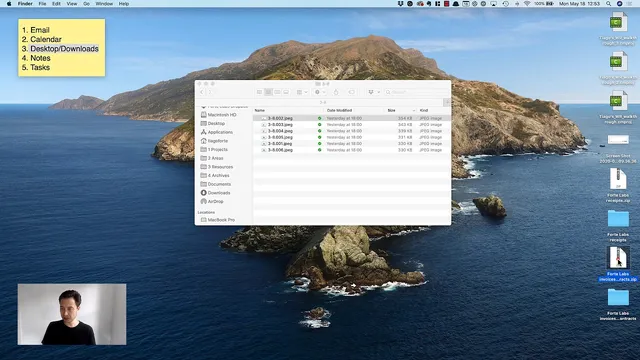
The routine starts with the desktop. Files accumulate there over the week, so the cleanup begins by opening Finder (via Command–N) and using a sidebar structure tied to the “para notebooks” organization system. Those folders—Projects, Areas, Resources, and Archives—sit inside the My Documents folder and function as the long-term file system for everything the creator might need to reference later.
Each desktop item gets a quick decision pass. On macOS, selecting a file and pressing the spacebar brings up a preview, letting the user confirm whether it’s worth keeping. Many items are short-lived artifacts: screenshots saved for sharing on Twitter, tweets kept only “in the moment,” and failed experiments such as exporting Evernote notes to HTML or PDF. These are deleted with Command–Delete, sending them straight to the Trash.
Not everything gets removed. When a file supports an ongoing effort, it gets moved into the right place. For example, interview recordings for an online course are placed into the Forte Academy folder. Course slides get sorted into the appropriate course/version folder (sometimes the uploads folder). Assets used for the weekly review series—images and slide decks—are kept in the relevant project area. Home-loan paperwork is handled with a practical rule: keep the usable documents, but delete compressed duplicates like ZIP files, then move the originals into a “home buying” project folder for mortgage approval.
After the desktop is cleared, the same approach is applied to Downloads. The user opens Downloads side-by-side and sorts items by what they are and whether they’re already installed or still needed. A podcast promo graphic is dragged into Evernote by dropping the image onto the Evernote icon, creating a dedicated note. A DMG installer file is deleted after confirming it’s already installed. Contracts and collaborator documents are moved into the relevant project folder, while temporary icons and guide images are placed where they belong. A key finishing step is emptying the Trash—right-clicking Trash and choosing “Empty Trash”—which provides a satisfying sense of completion and ensures deleted files don’t linger.
The result is a “fresh” desktop and a clean Downloads folder, ready for the new week, with files either discarded quickly or routed into Projects, Areas, Resources, or Archives so they’re easier to find later.
Cornell Notes
The routine focuses on two digital “workspaces”—a Mac desktop and the Downloads folder—and clears them during a weekly review. Desktop cleanup uses Finder and the PARA structure (Projects, Areas, Resources, Archives) inside My Documents, deciding for each file whether it should be deleted or moved. Quick previews (select + spacebar) help confirm what an item is before deleting it with Command–Delete. Downloads cleanup mirrors the same logic: move useful files into the right project or system (including dragging assets into Evernote), delete installers or temporary artifacts, and then empty the Trash for a true reset. The payoff is a clutter-free starting point for the next week.
Why target the desktop and Downloads specifically during a weekly review?
How does the cleanup decide where a file belongs or whether it should be deleted?
What is the PARA folder structure used for sorting?
What are examples of files that get deleted during the desktop pass?
How are Downloads items handled differently from desktop items?
Why empty the Trash at the end?
Review Questions
- When sorting a desktop file, what quick macOS step helps confirm what the file actually is before deciding to delete or move it?
- How does the PARA structure determine whether something belongs in Projects versus Archives? Provide one example from the described routine.
- What criteria lead to deleting items in Downloads (e.g., installers or temporary assets), and what happens to items that are still useful?
Key Points
- 1
Clear the desktop and Downloads folder weekly to reduce friction at the start of each work cycle.
- 2
Use Finder (Command–N) and a PARA-based folder structure (Projects, Areas, Resources, Archives) under My Documents for long-term storage.
- 3
Confirm file identity quickly with macOS preview (select + spacebar) before deleting or moving anything.
- 4
Delete short-lived artifacts immediately (social screenshots, tweets saved for the moment, failed export experiments) using Command–Delete.
- 5
Move active-work materials into the correct project folder (e.g., course recordings and slides into Forte Academy; home-loan documents into a home buying project).
- 6
In Downloads, treat DMG installer files as disposable after installation and route remaining useful files into Evernote or project folders.
- 7
Empty the Trash at the end to fully complete the reset and prevent deleted items from lingering.