How to create a shopping list & price tracker in Notion? | Beginner Tutorial + free template
Based on The Organized Notebook's video on YouTube. If you like this content, support the original creators by watching, liking and subscribing to their content.
Create two linked Notion databases: “products” for item details and “price tracker” for store-by-store pricing.
Briefing
A Notion setup for holiday and big-ticket shopping pairs a product catalog with a linked price tracker, letting shoppers compare prices across stores while keeping everything organized in one place. The core idea is to maintain two databases—one for products (with details like name, image, tags, and purchase status) and another for store-by-store price entries—then connect them through a relation so each product automatically displays its associated prices.
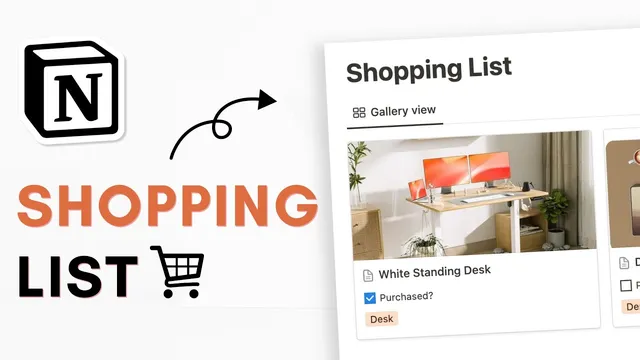
The build starts from an empty Notion page titled “shopping SL pricelist tracker,” with an optional icon and cover. The layout is tightened using small text and full-width formatting. Two databases are then created: a gallery view database called “products” (for browsing items visually) and a table view database called “price tracker” (for recording each store’s price). This structure is intentionally aimed at expensive purchases—electronics, TVs, or high-value gifts—where comparing multiple retailers matters more than maintaining a simple checklist.
To populate the system, the tutorial uses an example of shopping for a Ninja air fryer. In the “products” database, the item title is set, and a product image can be added via a pasted image link. Properties are added for organization and tracking: tags (e.g., “kitchen”), a checkbox for whether the item has been purchased, and optional cleanup of default properties. The gallery view is adjusted so the image preview fits nicely using the layout controls.
Next comes the “price tracker” database. Each price entry is tied back to a product using a relation field that links to the “products” database. For each store, the setup includes a multi-select “store” property (example: Amazon, Best Buy), a URL field to store the retailer link, and a “price” number property formatted in US dollars. A date property can capture when a sale ends, and another checkbox tracks whether the item has been bought. The example adds two entries for the same air fryer—one from Amazon and one from Best Buy—demonstrating how the relation keeps both price records associated with the same product.
The final step is making the system usable without manual repetition. A “product template” is created so every new product automatically includes a linked view of the “price tracker,” filtered to show only prices related to that product. The template is refined by hiding the database title for a cleaner look and adding optional sections for notes and web bookmarks. Additional property visibility and filters can be enabled so shoppers can focus on subsets like “kitchen items” or items with active sales.
By the end, the result is a flexible shopping dashboard: browse products visually, click into a product to see all store prices, and track purchase status and sale timing—ideal for Black Friday, Christmas shopping, or any period of frequent price changes. A completed template is provided via a link in the description.
Cornell Notes
The setup builds a Notion shopping system for big purchases by linking two databases: a “products” database and a “price tracker” database. Each price entry records the store, retailer URL, US-dollar price, optional sale end date, and purchase status. A relation field connects price entries back to the correct product, so multiple store prices appear under the same item. A product template then embeds a filtered linked view of the price tracker inside every new product page, making the workflow repeatable. This matters because it turns scattered price checks into one structured comparison tool for holiday shopping and electronics-level purchases.
Why use two databases (“products” and “price tracker”) instead of one checklist table?
How does the relation field make price comparisons work?
What properties are essential for each store price entry?
How does the product template reduce repetitive setup?
How can filters and visible properties make the dashboard more practical?
Review Questions
- If a shopper checks three stores for the same item, where should each store’s price be recorded, and how will it still appear under the correct product?
- Which specific properties in the “price tracker” database support comparison and sale tracking, and what optional field helps identify when a deal ends?
- How does setting a template as the default for all products change the workflow when adding a new item?
Key Points
- 1
Create two linked Notion databases: “products” for item details and “price tracker” for store-by-store pricing.
- 2
Use a relation field from “price tracker” to “products” so multiple store entries attach to the correct item.
- 3
Store retailer links in a URL property and record prices in a US-dollar number field for consistent comparison.
- 4
Add optional sale end date fields to track when prices change or promotions expire.
- 5
Use a product template with a filtered linked view of the price tracker so every new product page automatically shows its store prices.
- 6
Refine the layout by hiding database titles and exposing only the most useful properties (like purchased status) for faster scanning.
- 7
Add tags and checkboxes (e.g., purchased) to organize shopping lists by category and track progress during holiday sales.