Listing a template on Notion's Marketplace
Based on Notion's video on YouTube. If you like this content, support the original creators by watching, liking and subscribing to their content.
A template must be approved by Notion before it appears in the Marketplace, so the listing must be built for both discovery and review readiness.
Briefing
A strong Notion template listing is the difference between a useful template and one that actually gets discovered. Before a template appears in Notion’s Marketplace, it must be approved by the Notion team, so the listing has to do real work: communicate what the template is, who it’s for, and why it’s worth duplicating—using the marketplace’s discovery mechanics like titles, categories, and screenshots.
The listing starts with the title. It can differ from the template’s internal page title, but it should be short, descriptive, and immediately legible—like “Plan Tracker” for a plant-care workflow. Next comes the description, which should be brief and human-focused rather than filled with generic marketing phrases. A good description tells prospective users what they can expect after duplicating the template, including the core functions (for example, watering schedule tracking, common issues, and picture tracking).
Categories are where discovery often gets decided. Templates are found through featured placements and search categories, which are organized around themes (such as work or life) and Notion capabilities (like charts or AI). The guidance is to be specific: overly broad or too many category choices can make a listing feel noisy, reducing clarity for both search and browsing.
Screenshots provide the first “proof” users see. High-performing listings include three to five screenshots that highlight what’s unique and different about the template. Visuals are treated as a first impression and a conversion tool, and adding videos is encouraged as a way to both improve listing appeal and generate extra views.
Just as important as presentation is technical readiness. Templates get rejected for avoidable issues such as broken or inaccessible URLs, disabled duplication, poor image quality, incomplete content, AI-generated content that adds little additional value, branding problems, and unsupported languages. The practical takeaway is to double-check URLs, confirm duplication is enabled, and ensure both the template content and listing assets are complete and accessible.
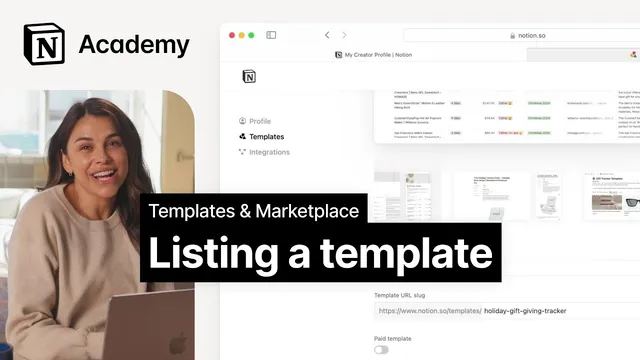
The walkthrough then turns these rules into a concrete build. After logging into a Creator profile at notion.so/profile/templates, a template author creates a listing by entering a title (for a holiday use case, “Holiday Gift Giving Tracker”), adding the correct publish link from Notion’s publish menu (not the “.com” address bar link), and generating a cover image. Additional screenshots can be added either by linking to sub-pages (auto-generating screenshots) or by manually uploading images; the listing supports “fun hacks” like including URLs so they appear in screenshots and linking to blocks so the screenshot scrolls to the right place. Since screenshots don’t update automatically after generation, any cleanup should be done before generating them, and image dimensions should match expected requirements.
Finally, the author selects categories (e.g., “Seasonal” plus “Gifts and Wish List”), writes a description that emphasizes real functionality—tracking gifts with purchase links and budget—and notes compatibility with the Web Clipper tool. Submitting triggers Notion team review. The core message: a great listing isn’t just promotion; it’s a problem-solving interface that helps the right users find and trust the template.
Cornell Notes
A Notion template must be approved before it appears in the Marketplace, so the listing has to maximize discovery and trust. The strongest listings use a short, descriptive title, a focused description that explains what users get after duplicating, specific categories that match how people search, and 3–5 high-quality screenshots (plus optional videos). Rejections commonly come from technical and content issues like broken URLs, disabled duplication, low-quality images, incomplete content, weak AI-generated value, branding problems, or unsupported languages. A practical workflow includes creating a Creator profile, adding the correct publish link from Notion’s publish menu, generating a cover image, adding screenshots (auto or manual), choosing categories, writing a functional description, and submitting for review.
Why does a template listing need more than a good template?
What makes a title and description effective in a Notion Marketplace listing?
How should categories be chosen to improve discovery?
What role do screenshots and videos play, and what are the practical constraints?
What are the most common reasons templates get rejected, and how can authors prevent them?
What is the correct workflow for creating a listing, including the publish link and screenshots?
Review Questions
- Which elements of a Notion template listing most directly affect discovery, and how do they work together?
- What technical and content issues commonly trigger template rejection, and what checks would you run before submitting?
- How do auto-generated screenshots differ from manually uploaded ones, and why does screenshot timing matter?
Key Points
- 1
A template must be approved by Notion before it appears in the Marketplace, so the listing must be built for both discovery and review readiness.
- 2
Use a short, descriptive title and a focused description that tells real users what they’ll get after duplicating the template.
- 3
Pick specific categories that match how people search and browse; avoid adding too many categories that make the listing feel noisy.
- 4
Include 3–5 high-quality screenshots that highlight unique features; consider adding videos to improve both listing appeal and reach.
- 5
Double-check technical details that trigger rejection: broken/inaccessible URLs, disabled duplication, poor image quality, incomplete content, weak AI-generated value, branding problems, and unsupported languages.
- 6
When generating screenshots, remember they won’t update automatically—make edits before generating and ensure image dimensions match expectations.
- 7
Submit through the Creator profile workflow after adding the correct publish link from Notion’s publish menu, selecting categories, and writing a functional, user-centered description.