Make a mind map to reflect your old-school Zettelkasten
Based on FP's video on YouTube. If you like this content, support the original creators by watching, liking and subscribing to their content.
Create a free Miro account (the transcript recommends using a school email) and build the assignment on a single board.
Briefing
A practical workflow turns an old-school Zettelkasten note-card system into a structured mind map using Miro, preserving the original card hierarchy while making it easier to visualize and share. The core idea is to recreate the same “folder cards” and “idea cards” relationships—complete with numbering and titles—inside a Miro mind map, so the digital layout mirrors the analog system rather than replacing it.
The process starts with setting up Miro: create a free account on the Miro website (the transcript recommends using a school email), then create a board for the mind map. Miro’s free plan supports up to three editable boards, and the instructions emphasize using a single board for one mind map. For simplicity, the web-based version is sufficient; the desktop/tablet/phone options are also acceptable as long as the mind map can be built.
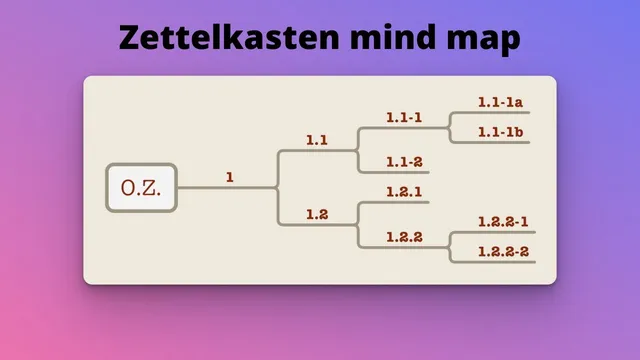
Once inside Miro, the workflow is straightforward: add a mind map, delete the default branches that aren’t needed, and begin building the structure from the top. The first major branch is labeled “Examined Life,” followed by “1.1 Philosophy.” From there, the next level is “Definitions of Philosophy,” which acts like a folder card. The next node becomes an idea card: “1.1.1-1 Philosophy equals thinking about thinking.”
The transcript then demonstrates how to extend the hierarchy by adding continuation nodes and sub-branches. After the “thinking about thinking” card, a related card is added as a continuation: “1.1.1-1a Philosophy equals criticism.” From that node, two child idea cards branch out: “1.1.1-1a1 Influential beliefs that should be challenged” and “1.1.1-1a2 Why we need philosophy.” The instructions also show how to create sibling nodes (using the plus sign or the Return key) and how to adjust layout by moving nodes and zooming so the map stays readable.
A key takeaway is that the mind map will eventually diverge from the specific Zettelkasten mind maps other students produce, even if the early structure matches the class-built cards. The goal is not to copy someone else’s layout, but to reflect the organization of one’s own note cards.
After the structure is in place, the final step is sharing: copy the board’s web link by opening the board list, clicking the three dots, and selecting the option to copy the board link. That URL is then pasted into the assignment submission field in Canvas, completing the task.
Cornell Notes
The transcript provides a step-by-step method for recreating an analog Zettelkasten note-card hierarchy as a digital mind map in Miro. After creating a free Miro account and a single board, the user adds a mind map, deletes default branches, and rebuilds the structure using numbered nodes and clear titles. The example starts with “Examined Life,” then “1.1 Philosophy,” then “Definitions of Philosophy,” and finally idea cards like “1.1.1-1 Philosophy equals thinking about thinking.” It shows how to add continuation nodes and sub-branches (including sibling nodes via the Return key), then adjust layout with moving and zooming. The assignment is finished by copying the board link and submitting it to Canvas.
How does the workflow preserve an analog Zettelkasten structure inside a digital mind map?
What are the first concrete steps to start building the mind map in Miro?
How are continuation and sub-branches handled in the example?
What methods are used to create new nodes besides clicking the plus sign?
How does the transcript suggest finishing the assignment after the mind map is built?
Review Questions
- When should a node be treated as a continuation versus a sibling in this workflow, and how does the numbering reflect that?
- What is the minimum setup needed in Miro (account and board) before building the mind map, according to the transcript?
- After building the mind map, what exact steps are used to submit it through Canvas?
Key Points
- 1
Create a free Miro account (the transcript recommends using a school email) and build the assignment on a single board.
- 2
Add a mind map in Miro, then delete the default branches so the structure starts clean.
- 3
Recreate the Zettelkasten hierarchy by using numbered nodes and consistent titles (e.g., “Examined Life” → “1.1 Philosophy” → “Definitions of Philosophy”).
- 4
Use idea-card nodes under folder-card nodes, and add continuation nodes as children of the relevant parent card.
- 5
Create sibling nodes using the Return key, and use panning/zooming to keep the layout readable.
- 6
Finish by copying the board link via the three-dots menu and pasting the URL into the Canvas submission field.