Session 45 - Hypothesis Testing Part 1 | DSMP 2023
Based on CampusX's video on YouTube. If you like this content, support the original creators by watching, liking and subscribing to their content.
Hypothesis testing converts sample results into a decision about population parameters by testing H0 (“no effect”) against H1 (“an effect exists”).
Briefing
Hypothesis testing is presented as the decision-making tool for turning sample data into probabilistic claims about a population—especially when business, finance, and economics can’t rely on “try it and see” forever. The core problem: observed results (like longer average YouTube view duration after changing a video style) can be caused by randomness, smarter timing, or other hidden factors. For high-stakes decisions—whether a new product should replace an old one, or whether a training program truly improves productivity—teams need a structured way to test whether an observed difference is strong enough to reject a “no change” assumption.
The session frames hypothesis testing around two competing statements. The null hypothesis (H0) assumes no significant effect or difference—“nothing new is happening.” The alternative hypothesis (H1) contradicts H0 and represents the effect of interest—“the new method increases/decreases the metric” or “the weight is not equal to the claimed value.” A key rule of thumb is emphasized: H0 is the status-quo baseline, and H1 is the challenge. After collecting data, the logic is not “prove H0 true,” but “reject H0 if evidence is strong enough.” Confusion is addressed directly: failing to reject H0 does not mean H0 is true; it only means the data didn’t provide sufficient evidence against it.
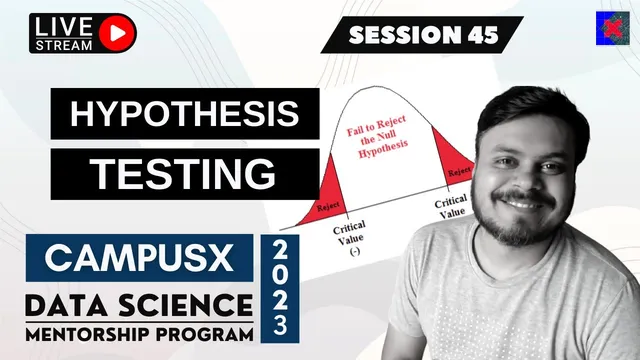
To operationalize the decision, the lecture introduces the “rejection region approach” as a step-by-step workflow. First, H0 and H1 are defined (e.g., average view duration is equal to 6 minutes under the old vs. new shooting technique, or a product weight equals 50 grams). Next, a significance level (α) is chosen—commonly 0.05 or 0.01—which represents the probability of rejecting H0 when H0 is actually true (linked to Type I error). Then assumptions determine which test to use (for example, a z-test when population standard deviation is known and a t-test when it isn’t). After computing a test statistic (like a t-statistic), the result is compared to critical values on a normal curve to decide whether to reject or not reject H0. The session also walks through two concrete examples: a training program productivity test (sample mean productivity rises from a baseline of 50 to 53 with n=30, σ known) and a consumer “50 grams” weight claim test (testing whether the mean weight differs from 50 using a two-sided setup with σ=4 and n=40).
The lecture then pivots to limitations of the rejection-region method: it can’t meaningfully distinguish between very close test statistics (e.g., 1.95 vs. 1.97) if both fall on the same side of the boundary. That motivates the next approach—p-value—promised for the following class. Additional foundational concepts are introduced: Type I vs. Type II errors, the trade-off controlled by α, and the difference between one-tailed and two-tailed tests based on whether the alternative hypothesis specifies “greater than,” “less than,” or “not equal to.” Finally, hypothesis testing is positioned as broadly useful across domains—evaluating interventions, comparing means and proportions, analyzing relationships, testing independence of categorical variables, and supporting machine learning tasks like model comparison, feature selection, hyperparameter tuning, and checking algorithm assumptions.
Cornell Notes
Hypothesis testing turns sample evidence into a structured decision about population parameters by pitting a null hypothesis (H0: “no effect”) against an alternative hypothesis (H1: “an effect exists”). The session emphasizes that rejecting H0 means the data provide strong evidence against “no change,” while failing to reject H0 does not prove H0 is true. A significance level α (often 0.05 or 0.01) sets the tolerance for Type I error—rejecting H0 when it’s actually true. Using the rejection-region approach, the workflow defines H0/H1, chooses α, checks assumptions (z-test vs t-test), computes a test statistic, and compares it to critical values to decide reject vs not reject. Examples include testing whether a training program increases productivity and whether a package’s mean weight differs from 50 grams.
Why does hypothesis testing exist if you already observe differences in data (like longer view duration after changing a video style)?
What is the null hypothesis (H0) and how is it chosen?
What is the alternative hypothesis (H1), and how does it relate to H0?
How does the rejection-region approach use α to decide reject vs not reject?
What’s the key difference between Type I and Type II errors?
When should a one-tailed test be used instead of a two-tailed test?
Review Questions
- In your own words, why does failing to reject H0 not equal proving H0 is true?
- Describe the step-by-step rejection-region workflow for a hypothesis test, including where α is used.
- Give one example of a scenario where a one-tailed test is appropriate and explain why the direction matters.
Key Points
- 1
Hypothesis testing converts sample results into a decision about population parameters by testing H0 (“no effect”) against H1 (“an effect exists”).
- 2
Rejecting H0 is evidence-based; not rejecting H0 does not prove H0 is true—it only means the evidence wasn’t strong enough.
- 3
The significance level α sets the probability of a Type I error (rejecting H0 when it’s actually true).
- 4
The rejection-region approach uses critical values: compute a test statistic and compare it to the rejection region to decide reject vs not reject.
- 5
Choosing the correct test depends on assumptions (e.g., whether population standard deviation is known leads to z-test; unknown leads to t-test).
- 6
One-tailed vs two-tailed tests depend on whether H1 specifies direction (greater/less) or “not equal to.”
- 7
Type I and Type II errors trade off: tightening α reduces Type I error risk but can increase Type II error risk.