BINDER SETUP and Organisation Step-by-Step // For Highschool and College
Based on Mariana Vieira's video on YouTube. If you like this content, support the original creators by watching, liking and subscribing to their content.
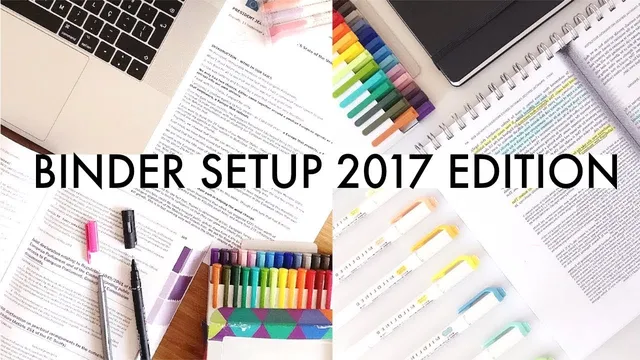
Start with an affordable three- or four-ring binder (around 1.5 inches) that can be customized and won’t damage paper easily.
Briefing
A budget-friendly binder setup can still feel highly personalized and fast to use if the system starts with the right binder and the right paper. The core recommendation is to buy a simple, affordable 1.5-inch (about 2-inch) three- or four-ring binder—ideally with a clear plastic pocket on the inside cover—then customize the front, dividers, and inserts so subjects and loose materials stay easy to find. The clear pocket is positioned for items that don’t yet have a permanent home, like schedules, loose handouts, or other “in-between” papers.
Paper choice drives whether the organization works day to day. For note-taking, the preferred refill style is square or dotted paper, because it supports structured writing and diagrams while still being easy to scan. The transcript names multiple paper brands used for this approach, including a Spanish brand (called “me Calvin’s,” as heard), Oxford (European), and refills found from Target and Amazon. A key detail is the use of colored margins: different colors help create a quick visual subject code, so a student can identify the topic even without opening the binder.
The setup also includes “instant access” inserts that reduce friction during class. One method is creating a notepad section at the back of the binder by aligning blank paper with the binder’s back and securing it with a binder clip, leaving only the clip visible when the binder is closed. Another add-on is studying aids that stick out for quick grabs. Post-it notes and flags can be peeled and attached so they protrude from the binder for immediate access. Flashcards—without sticky backing—can be clipped into the binder using the same binder-clip approach, with the suggestion to write questions and answers on both sides for later review.
Scheduling and front-cover customization round out the system. A class schedule can be placed directly into the clear pocket or taped into a dashboard area so it’s visible whenever the binder opens. For the divider covers, the transcript suggests either printing large images from the internet and sliding them under the plastic cover or designing custom divider pages in software. Simplicity is favored for dividers: plain white cardboard dividers are described as cheaper than plastic, though cardstock and patterned designs are optional.
Organization inside the binder depends on the student’s study style. If one binder holds multiple subjects, each divider can map to a subject. If each binder is dedicated to one subject, dividers can instead separate types of materials—class notes, assignments/handouts/syllabi, tasks and exam prep, and secondary readings like articles, field-trip materials, or relevant book/movie notes. The first divider is often reserved for semester-wide documents such as the syllabus, yearly calendar, assignment lists, and bibliography.
To make the system actionable, the transcript describes a “question dashboard” approach: a small notebook or notepad double-taped to the front of the binder holds prioritized questions from different classes. When an item can’t be checked off, the student approaches the professor for clarification.
Finally, the method is framed as a practical solution for high school and early college, while acknowledging that later coursework may require a different approach. The creator shifts toward paperless note-taking for a master’s program and plans to experiment with a new binder organization system for archiving notes on paper or in a digital workflow.
Cornell Notes
The transcript lays out a low-cost binder system built around three choices: an affordable three- or four-ring binder (often with a clear pocket), note paper with square or dotted layouts plus colored margins for subject coding, and divider/inserts that make key materials instantly reachable. It recommends adding a back-of-binder blank-paper notepad using a binder clip, plus study tools like protruding Post-it notes/flags and clipped-in flashcards for quick review. Inside the binder, dividers can be organized either by subject or by document type (notes, assignments, exam prep, and secondary readings). A front “dashboard” can hold schedules and a question list so students can track what to ask professors and what to study next.
Why does the binder itself matter in a “cheap but efficient” setup?
How does paper choice improve day-to-day organization?
What are the “instant access” inserts, and how are they attached?
How can sticky study tools be integrated without making a mess?
What divider strategy works best: by subject or by document type?
How does the system help students remember questions to ask professors?
Review Questions
- What binder features (size, ring count, pockets) does the transcript recommend, and how do they support organization?
- How do colored margins on square/dotted paper function as a subject-coding system?
- Describe two insert types added to the binder and the attachment method used for each.
Key Points
- 1
Start with an affordable three- or four-ring binder (around 1.5 inches) that can be customized and won’t damage paper easily.
- 2
Choose square or dotted refill paper, ideally with colored margins to create a quick subject code.
- 3
Use the clear plastic pocket on the inside cover to hold schedules and loose papers that don’t yet have a fixed place.
- 4
Add a back-of-binder blank-paper notepad secured with a binder clip for fast diagrams, tables, and mind maps.
- 5
Integrate study tools by making Post-it notes/flags protrude for quick access and clipping flashcards into the binder for review.
- 6
Organize dividers either by subject or by document type, and keep semester-wide materials (syllabus, calendar, bibliography) near the front.
- 7
Use a front dashboard/notepad to track and prioritize questions so unresolved items can be taken to professors.