Customising your Daily Note Template
Based on Capacities's video on YouTube. If you like this content, support the original creators by watching, liking and subscribing to their content.
Create the schedule as a table, expand it with additional rows, and convert the first column into a header column to keep time labels distinct.
Briefing
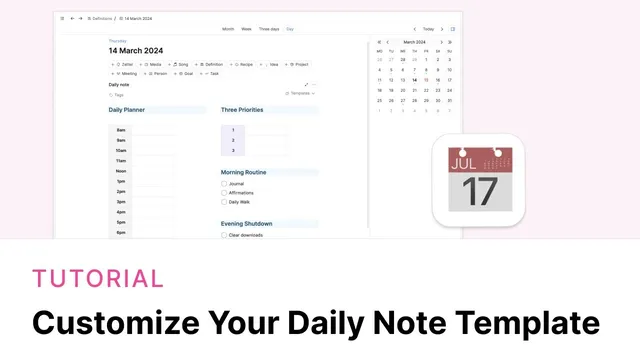
A practical daily note layout in Capacities can be built from two side-by-side tables—one for a time-blocked schedule and one for daily priorities—then extended with morning/evening sections made of to-do blocks, finally saved as a reusable template that auto-applies to future daily notes.
The build starts with the biggest visual element: a schedule table. Using the forward slash command (or the plus button), a 2x3 table is inserted, then expanded by adding rows so it can cover more hours of the day. Times are entered cell-by-cell, with navigation aided by the down arrow. After removing unnecessary rows and resizing the table width, the first column is converted into a header column so the time labels stay visually distinct. Text alignment is standardized by formatting the column—specifically centering the contents via the column format menu.
A second table is created for priorities. Another table block is added beneath the schedule area, kept at a simple 1–3 column structure, and centered for consistency. Like the schedule table, its first column can be treated as a header column, including optional color styling through the style controls in the column formatting menu (for example, applying a violet header background).
To place both tables side by side, the layout is restructured using columns. The workflow recommends creating columns by shift-clicking the plus button at the top of the page, then inserting a “columns” block. Once the columns exist, the schedule and priorities tables are dragged into their respective column areas.
Headings are added above each section using Capacities’ heading hierarchy. A “Daily Planner” heading is inserted as a heading block (either via the hierarchy options in the text block menu or via shortcuts like “/3” or markdown-style “###”). Styling is handled at two levels: text styling and block styling. The preferred approach in this setup is styling the entire block behind the heading, using the style icon and the highlighted region to control what gets colored.
Morning and evening routines are then layered in. A block is inserted above or below tables using shift-click (above) or click (below). Morning routine items are created as to-do blocks using the bracket-style to-do creation flow. These to-dos include checkboxes by default; some users may also see task-action controls (send arrows) if task actions are enabled on paid plans and integrations are configured, but the workflow keeps it simple by using the standard to-do behavior. Each routine item is optionally given a sky background using the style panel (with the keyboard shortcut Command-Shift-E to expand/contract the styling panel).
Finally, the whole layout is turned into a template. Everything is highlighted and copied, then saved under Templates as a new template (named “new planner” in the walkthrough) with the date field set appropriately. If copying ever fails to preserve the column structure, the columns are recreated and content is dragged back into place. To make the template automatically apply to future daily notes, it’s marked as default using the template button’s star option. Editing the default later updates future notes only, while past daily notes remain unchanged; un-starring removes default behavior without retroactively altering existing notes.
Cornell Notes
The walkthrough builds a “Daily Planner” daily note in Capacities using two side-by-side tables plus routine sections. A time-block schedule table is expanded to fit the day, with the first column set as a header and the column formatting used to center text. A second priorities table is created with its own header styling, then both tables are placed into a two-column layout. Morning and evening routines are added as to-do blocks under heading blocks, with optional sky background styling. The finished layout is saved as a template and marked as default so new daily notes automatically start with the same structure.
How does the setup make the schedule table readable and consistent across different times of day?
What’s the difference between styling text and styling the whole block, and which approach is used here?
How are the two tables positioned side by side instead of stacked?
Why do some to-do blocks show extra task-action controls, and how is that handled?
What steps turn the finished daily note layout into a reusable template that applies automatically?
If the template needs changes later, what happens to already-created daily notes?
Review Questions
- What table settings and formatting steps are used to make the time-block schedule table function like a stable “header + editable cells” grid?
- How does the workflow create and place headings, and what shortcut options are mentioned for heading levels?
- What is the difference between marking a template as default and editing it later in terms of how past daily notes are affected?
Key Points
- 1
Create the schedule as a table, expand it with additional rows, and convert the first column into a header column to keep time labels distinct.
- 2
Use column formatting to center-align table text for a cleaner, consistent look.
- 3
Build a separate priorities table with its own header column styling, including optional header colors.
- 4
Insert a two-column layout using the “columns” block, then drag the schedule and priorities tables into separate columns.
- 5
Add “Daily Planner” and routine headings using Capacities heading hierarchy (including shortcuts like /3 or ###).
- 6
Create morning/evening routines as to-do blocks and apply background styling (e.g., sky) via the style panel.
- 7
Save the finished layout as a template and mark it as default with the star so future daily notes automatically reuse the structure.