How to Use Synced Blocks in Notion?! | Full Guide & Tutorial
Based on The Organized Notebook's video on YouTube. If you like this content, support the original creators by watching, liking and subscribing to their content.
Synced blocks keep content consistent across pages by propagating edits to every synced instance.
Briefing
Synced blocks in Notion let a single piece of content stay consistent across multiple pages—edit it anywhere and every synced instance updates at once. That makes them a practical tool for shared information like company mission statements, recurring events, or any text and components that must not drift out of sync.
Creating a synced block is straightforward: type “/synced,” choose “sync block,” and Notion inserts a block that can be copied and pasted anywhere. Once multiple synced blocks exist, changes made in one location automatically propagate to all others. The tutorial demonstrates this by pasting the same synced block into a separate page and then editing it on either page—both locations reflect the updates immediately. Notion also provides a way to audit where the synced block appears: a control shows every instance, distinguishing the original from copies across pages. If the shared behavior is no longer needed, the block can be “unsynced” using the block’s menu (unsync all), returning each instance to a normal, independent block.
Beyond plain text, synced blocks can be created from existing content. The workflow is to select a block, use the six-dot menu, choose “turn into,” and convert it into a sync block. Once converted, the synced container can hold more than text—buttons and other standard Notion elements can live inside it—so teams can share interactive components, not just static copy.
The guide then lays out three common use cases. First, synced blocks work well for company-wide information that should appear across departments, such as “mission and values” or a centralized events section. Instead of manually updating each page, one synced source can be copied into multiple team areas so everyone sees the same latest content.
Second, synced blocks can support lightweight, checklist-style workflows. The tutorial recommends pairing them with a database template for daily planning: each daily plan uses a template that includes a synced to-do list. As a result, a task like “pick up groceries” appears in the daily plan and also in the main dashboard view, regardless of how many daily plans are created.
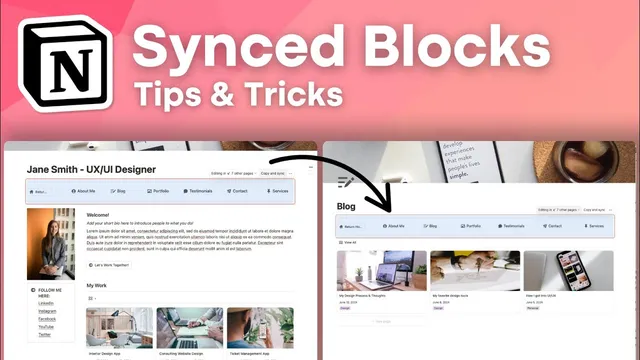
Third, synced blocks can function as a navigation system. A navigation block can be built by adding pages (e.g., “About me” and “Services”) inside a synced navigation container, then pasting that synced navigation into each page. Buttons can be added to jump back to a home page using an “open page” action tied to the page link, keeping navigation consistent across sections.
Two key cautions close the tutorial. Anyone with permission to edit a synced block can change every instance, so access should be controlled. And while synced blocks can be used for many elements, the guide advises against syncing databases inside synced blocks; instead, use linked view databases, which provide database-level syncing without forcing database objects into a synced container. In short: use synced blocks for shared non-database content and linked views for shared database content.
Cornell Notes
Synced blocks in Notion keep content consistent across multiple pages: edit one instance and every synced copy updates instantly. They can be created from scratch (via “/synced”) or converted from existing content (“turn into” → sync block), and they can include more than text—such as buttons and other Notion elements. The tutorial highlights three practical uses: company-wide mission/events sections, a synced to-do list embedded in a daily-planner template, and a synced navigation bar shared across pages. Key risks include permission control (edit access affects all instances) and the recommendation to avoid putting databases inside synced blocks, using linked view databases instead.
How does a synced block behave once it’s placed on multiple pages?
How can someone find every place a synced block appears, and how can it be stopped?
What’s the difference between using synced blocks for non-database content versus databases?
How can synced blocks support a company-wide “mission and values” section?
How can synced blocks be used for navigation across pages?
Why does permission matter with synced blocks?
Review Questions
- When you edit a synced block on one page, what happens to the same synced block on other pages—and why?
- What two strategies does the tutorial recommend for syncing databases versus syncing non-database elements?
- Give one example of a navigation or checklist workflow where synced blocks would reduce repetitive updates.
Key Points
- 1
Synced blocks keep content consistent across pages by propagating edits to every synced instance.
- 2
Create synced blocks quickly with “/synced” → “sync block,” or convert existing content using “turn into” → “sync block.”
- 3
Use the instance list to see where a synced block appears, and use “unsync all” to stop syncing.
- 4
Synced blocks work well for shared non-database content like mission statements, events, buttons, and navigation.
- 5
For database syncing, prefer linked view databases instead of placing databases inside synced blocks.
- 6
Control edit permissions carefully: anyone allowed to edit a synced block can change all its copies everywhere.