Notion for Productivity: Automate Recurring Checklists (Free Template)
Based on Red Gregory's video on YouTube. If you like this content, support the original creators by watching, liking and subscribing to their content.
Create a “My projects” database with only the essential tracking fields: a “completed” checkbox and a “due date” date property.
Briefing
A new Notion workflow turns recurring project checklists into an automated, database-native system: each time someone creates a project, Notion buttons generate the same structured sub-tasks inside that project automatically. The payoff is less copy-pasting and fewer missed steps—especially for template creators and agencies that repeatedly build similar deliverables like “make databases,” “make page templates,” “make dashboard,” and “launch template.”
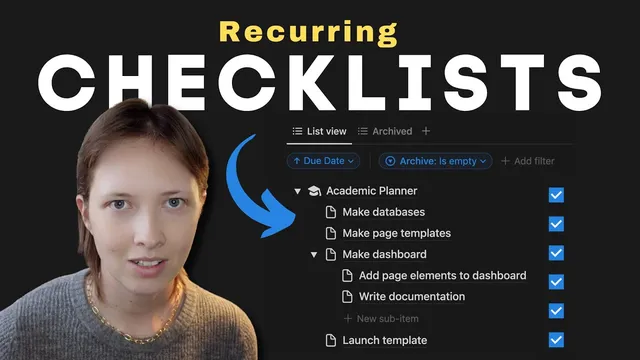
The setup starts with a simple “My projects” database built from a List view. The default properties are pared down to essentials: a checkbox called “completed” and a date field called “due date” (formatted as month/day/year). The creator also removes unnecessary page discussion elements to keep the interface clean. After renaming the first sample project page (e.g., “academic planner”), the database view is adjusted so “completed” and “due date” appear as the key fields.
Recurring checklist structure is handled using Notion’s “sub items.” Inside the database, “sub items” create an outline hierarchy where each project page can contain nested tasks. The checklist is built once as sub items under a project: “make databases,” “make page templates,” “make dashboard,” and “launch template,” with “make dashboard” further expanding into sub-tasks like “add page elements to dashboard” and “write documentation.”
The automation comes from a button placed at the top of the database. A “new project” button creates a new page in the “My projects” database, then duplicates a sequence of sub items under the correct parent tasks. Parent-child relationships matter: “make databases” and “make page templates” attach directly under the new project, while “add page elements to dashboard” and “write documentation” attach under “make dashboard.” The final step opens the newly created project page so the user can immediately set a title and due date. Pressing the button results in a fresh project page populated with the recurring checklist.
To manage lifecycle, the workflow adds archiving controls. A basic filter can hide completed projects by showing only items where “completed is unchecked,” but that can make progress tracking disappear. Instead, the creator adds a Select property called “archive” with an “archive” option. A filtered view then shows items where “archive is not archive,” preserving visibility of completed subtasks while still separating archived work.
Finally, a second button—“archive 100 tasks”—gives manual control. It edits pages in “My projects,” targets all pages where “completed” is true, and forces the “archive” select property to the “archive” option. With optional UI tweaks like hiding database titles and sorting by due date, the system becomes a repeatable checklist engine for every new project, while keeping completed work visible until the user chooses to archive it.
Cornell Notes
The workflow builds a Notion database (“My projects”) where each new project automatically receives a recurring checklist of sub-tasks. It uses sub items to define the checklist hierarchy once (including nested tasks under “make dashboard”), then a “new project” button duplicates that structure into a brand-new project page and opens it for editing. A “completed” checkbox and “due date” field keep tracking simple. For archiving, the system avoids hiding progress by using a separate Select property (“archive”) and a manual “archive” button that marks completed projects as archived. This combination reduces repetitive setup work while preserving visual progress.
How does the system ensure every new project gets the same checklist without manual re-typing?
Why does the automation need to specify “parent item” for different checklist steps?
What properties are used for tracking and scheduling, and how are they configured?
What problem can happen with a simple “completed unchecked” filter, and how is it addressed?
How does the manual archiving button work in practice?
Review Questions
- If you wanted a checklist item to appear nested under “make dashboard” rather than directly under the project, what part of the button automation would you change?
- What’s the difference between filtering by “completed is unchecked” versus using a separate “archive” property for archiving?
- How would you modify the system to add a new recurring step (e.g., “QA review”) to every project without breaking the hierarchy?
Key Points
- 1
Create a “My projects” database with only the essential tracking fields: a “completed” checkbox and a “due date” date property.
- 2
Use “sub items” to build a reusable checklist hierarchy once, including nested tasks under specific parent steps like “make dashboard.”
- 3
Add a “new project” button that creates a new project page and duplicates checklist sub items under the correct parent item for each step.
- 4
Open the newly created project page at the end of the button flow so the user can immediately set the project title and due date.
- 5
Avoid losing progress by not relying solely on “completed unchecked” filters; instead add a Select property named “archive.”
- 6
Use a manual “archive” button that targets completed pages and sets the “archive” property, giving control over when items move out of the active view.
- 7
Optional UI cleanup—like hiding database titles and sorting by due date—helps the system stay readable as it scales.